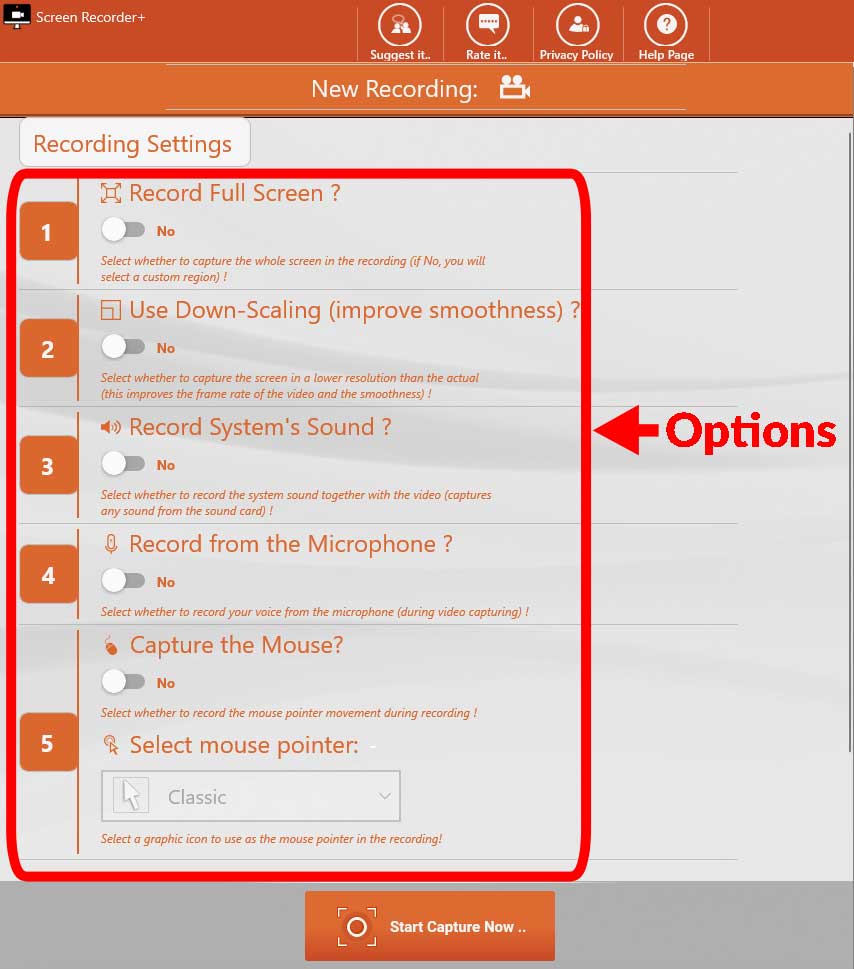
If you select this option (ON), then the whole screen will be captured, including the windows taskbar, the time, etc.. During recording, the "Capture Window" will ignore any other reposition or resize you will make on it. If you set it to (OFF), then the "Capture Window" will record whatever will be displayed inside it.
Be careful when you choose to capture the entire screen, as the final video file will be large and possibly the frame rate of the final video will be reduced. (The Frame Rate of a video, is the number of frames that the video contains, per second (FPS = Frames Per Second). Generally we want a video to have as high Frame Rate as possible (an ideal number will be over 25-30 FPS which is a movie standard). Always, the larger this number is, the better video quality it produces. By capturing the whole screen, the FPS will be reduced, but it depends on your Hardware capabilities, the CPU speed, the RAM available, and the quality of your graphic processor!
2) Use Down-scaling Option:
This option is one of the most crucial and we have decided to keep it as simple as possible. You have two choices: Either enable it (ON), or disable it (OFF). It is a trade-off between Smoothness and High-Resolution of the final video.
If you set it to (OFF), then the final video will be recorded in the actual analysis of the Capture Area that the graphics card is using, even if you use a (e.g. 125% or 150%) scale for your Windows Screen. What does it mean? It means that it will produce a high-resolution video but, maybe with somehow lower Frame Per Second. So, the final video will be not so smooth.
Otherwise, if you select to enable this option (ON), then the final video will be downscaled by a factor (for example a 2560x1600 full screen video will be recorded in a 1280x800, but the Frame Rate will be increased. This will produce a very smooth video, without any choppy, even if you record a YouTube video from a browsers, but with lower resolution!
So, there is no magic option to decide what to choose. The above options work differently and it really depends on your Hardware (RAM PC, graphic card, etc) and what you want to record. If you want precise recording and you don't have many animated things, then go with the "OFF" option, but if the result is not so smooth, then enable it!
3 and 4) Record the System Sound or Microphone:
These two options have already been discussed in detail. Simply Enable (ON) or disable (OFF) each of them.
5)Mouse Pointer Recording:
If you are familiar with Screen Recording software you may already know that many other Screen Recording applications have limited option in mouse capture pointer. But, there are situations where you really want to capture the mouse. So, we have added this feature with some extended options, to use a colorful mouse pointer on the final video. Simply enable it and select the pointer you want. If you don't need the mouse pointer, keep it disabled!
Finished Recording...?
Next steps ..
So, you have succesfully record your first video with the "Screen Recorder+" application ! Hurray!!
Let's see what you can do next .. and where exactly the application stores the videos!