Here we provide a small guide: How to start, stop or re-start a recording. We also analyze the options to record the sound together with the video, either from your microphone, (voice recording over the video) or from the sound card.
First of all you must keep in mind that the Screen Recorder+ application is able to record a specific window area on your screen and not a specific application. Whatever is inside this capture area window is recorded and added to the final video.
During the recording you are able to work as usual: Open applications, minimize or restore them, open a video, browse YouTube, etc..
During the recording you are able to work as usual: Open applications, minimize or restore them, open a video, browse YouTube, etc..
Ready to Start a new Recording ?
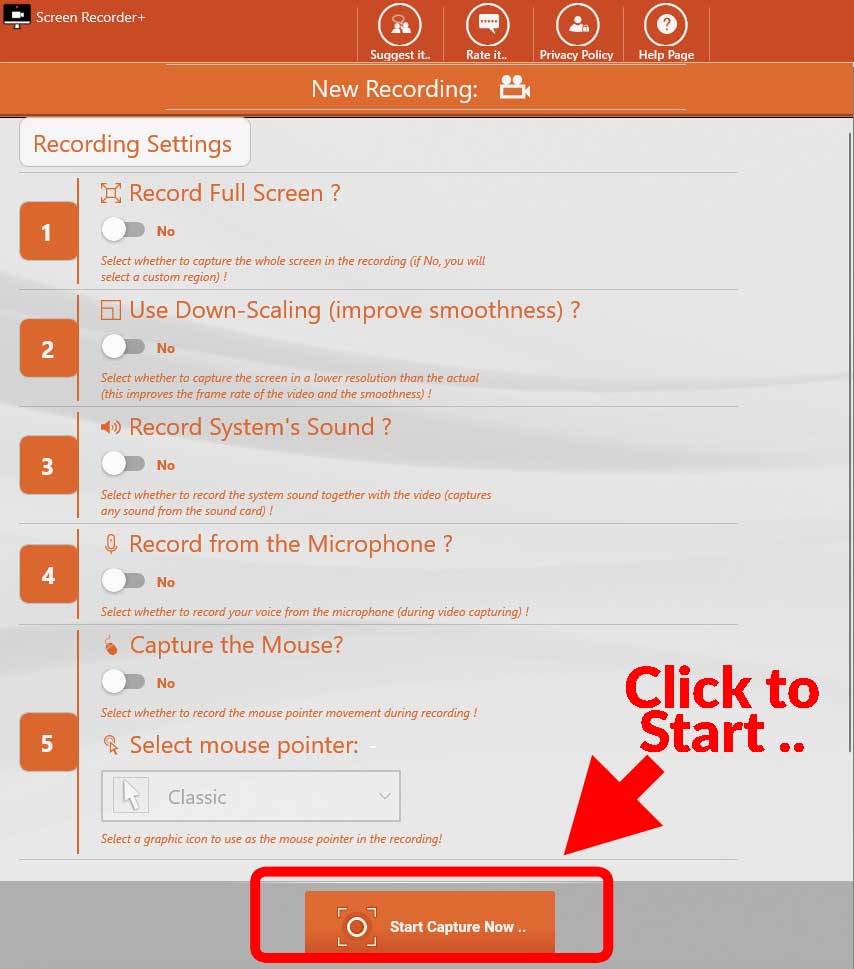
When you first launch the Screen Recorder+ application you will see the main page, like the example screenshot below. There you will check the Recording Settings that will be used for the next recording, and on the bottom you will see a button "Start Capture Now..".
When you click on the "Start Capture Now .." button the above window will be minimized (don't close it during the recording, it's actually the main application and it will break the recording!) and a new transparent window will be activated..
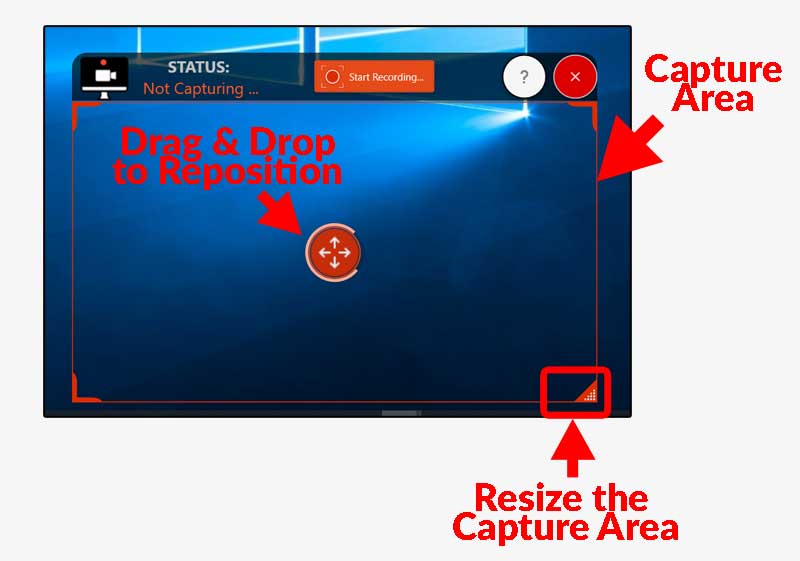
This transparent window is the Capture Control Window of the application. Here, you are able to set the Capture area that you are interested (except if you have chosen to record the entire screen).
The capture area is defined inside the red borders. You are able to reposition the capture window on your screen or to resize to fit/cover the area you wish. Any activity inside this area will be recorded, even if there will be placed multiple other apps.
When you are ready to start, press the "Start Recording.." button on the top of the control and the recording will start in 3 seconds.
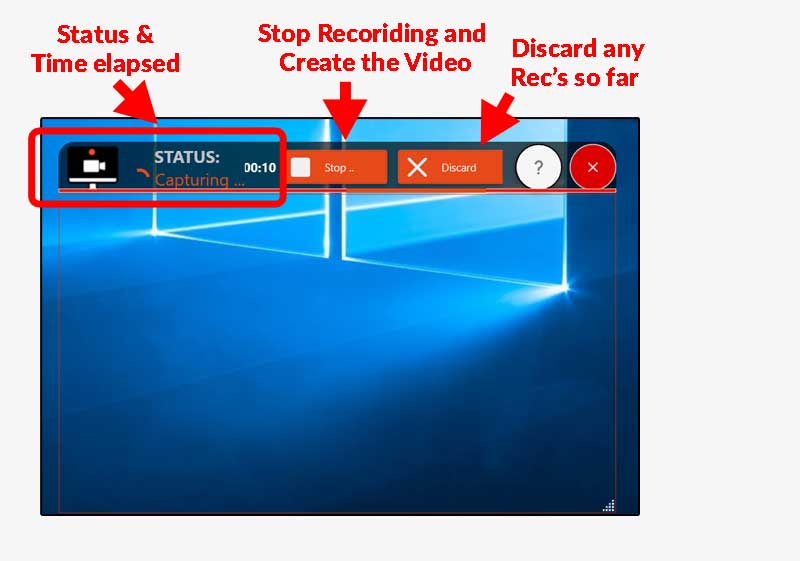
On the above screenshot, the application is capturing everything inside the capture window. If you click on the "Stop.." button, the recording will stop immediately, and the video will be auto-saved on your Videos Folder. Clicking on the "Discard.." button will stop the recording so far and will delete any recording so far.
Sound Recording...?
Sound card, Voice Recording, or mute ..
Based on your preferences before starting the recording, the "Screen Recorder+" application will record together with the final video your voice, or the System's sound, as it is played on the sound card (meaning any sound that you hear from the speakers) or no sound at all.
Behind the scenes, the application actually creates one video file in .MP4 format (it's the screen recording without sound), a .MP3 sound file with your voice (only if you have choose this option) and another sound file (.WAV format) with the Windows 10 System Sound (again, only if you have enable this option).
Finally, the app keeps only one .MP4 video (with or without audio!).
The user is presented with the final recording video where all the above media files are combined together (for large duration recordings, it will take sometime to encode the above media into one file, but the process will be super-fast!).
Mouse Pointer Capture...?
Capturing the mouse pointer during the recording ..
Among other things, the "Screen Recorder+" application is able to capture and record inside the final Recording video the mouse activity during your work.
This is extremely useful if you have plans to create a showcase-example video of some work activity in your Windows 10 PC and you really want the mouse pointer to be visible.
The app supports many different mouse pointers to choose from for be displayed in the final Recording video. If you don't want to capture the mouse activity, then simple choose to disable this feature on the Recording Settings Window, (before the recording starts).
We have already mention many of the Recording Options you have for your Screen Recordings.
Don't you think it's time to take a closer look on them?
Click on the link below:
Don't you think it's time to take a closer look on them?
Click on the link below:
